
Unfortunately, I never was able to create my ideal cheesecake at home. In fact I was never able to create any cheesecake at home! My cheesecake always turned out thin and dry, with deep craters on the top.
So I quit making cheesecake for a while. But I hadn't quite given up the idea of creating the perfect one right here at home. I researched making cheesecake online and, lo and behold! Apparently you were supposed to bake cheesecake in a water bath to keep it from drying and cracking. (I'd never even heard of a water bath.) But on the other hand, water baths often (apparently) made your cheesecake soggy. Oh, and if you don't mix your cheesecake enough the results are (apparently) disastrous. Yet if you mix it too much, it'll crack!
While I was sifting through all these contradictory "Ultimate Cheesecake" recipes and tips, I came across one that looked legit. Still, it used that troublesome, tricky water bath. So I decided that instead of an actual water bath, where you float the cheesecake pan in an actual pan of water, I would do what I did when baking bread: put a large pan of water on the bottom rack underneath the oven and call it a day.
So with great trepidation I got out all my ingredients and made the cheesecake, documenting every step. And at the end of the day, it came out.....perfect.
That's my little story. Of course I had to share it. Now that you've read through all that, let's get to the actual cheesecake!
To begin with, here's a picture of the things I used:

As for an actual list:
Graham Crackers
Butter
Cream Cheese
Granulated Sugar
Milk (What you see in the picture is Half'n'half. I mixed it with water since I didn't have milk)
Eggs
Vanilla
Sour Cream
I also used some brown sugar and flour, which are optional and so not pictured.
To begin with, preheat the oven to 350.
Now make the crust for the cheesecake. I used about 13 crackers, which made a rather thick crust.

Break the crackers up and throw them into a large bag.

Now get out a rolling pin and smash the crackers to crumbs! This shouldn't take too long.

I could have smashed mine smaller than this, but I don't mind larger crumbs in the crust.

Now melt 3-4 tablespoons of butter.

Pour the butter into the bag. I added a tablespoon of brown sugar before this step, because I wanted a sweeter crust. But you don't have to. It's all about personal taste!

Making the crust of a cheesecake is all about feel. I needed about 4 tablespoons of butter for my crust. You should be able to squeeze a handful of the crust without it crumbling apart immediately. Don't add more butter than that, or the crust will burn.
Now prepare the pan!

This is a springform pan. It's what you normally use to make cheesecake. That's because you can take the sides off at the end and have a perfect cheesecake, without having to worry about sliding it out of the pan without tearing it. (I'll show you!) Some people do use cake pans, but I'm sure it wouldn't work. Not that I've ever tried it...
First, cut out a circle of parchment paper slightly larger than the bottom of the pan.


I then buttered the sides of the round part of the pan, because I didn't want the cheesecake to stick.
Now close the pan and press the parchment paper down onto the bottom.

Dump in the prepared crust!

Use your fingers to pat it down, then use the bottom of a glass to get it flatter.

Bake the crust in the oven for 12 minutes. This is to keep it from getting soggy.
While the crust is baking, prepare the batter.
Here's all the cream cheese! IMPORTANT: it must be room temperature!! This is 4 blocks. Most cheesecake recipes use 3, but I like to taste the cream cheese flavor itself. This really does it, and it also helps with making a richer, denser cheesecake.

Throw the cream cheese into a bowl.

Add 1 1/2 cups of sugar.

Mix the cream cheese and the sugar ON LOW SPEED or by hand until it's just combined. It really is important not to overmix the cheesecake! (I'll tell you why in a minute.) And I totally forgot to take any pictures of anything being mixed. I was too worried about not overmixing.
This is 3/4 cup of milk and 4 eggs. That's what goes into the cheesecake next.

Again, I don't have a picture of the mixing. I added the milk and mixed on low until it was just mixed in. Then I added the eggs one at a time. This was when it occurred to me to take this picture:

Doesn't tell you anything, does it.
Anyway, after all this was mixed in, I took the bowl off of my stand mixer and mixed it by hand. Here's a cup of sour cream, 1 tablespoon of flour (optional) and a tablespoon of vanilla.

Mix it until it's just combined.

When all this has been mixed together, pour it into the (closed) springform pan on top of the pre-baked crust.


And now: this is important! (Again, I'll tell you why soon.) Wrap the pan in a piece of heavy duty foil.

Now preheat the oven to 250. That sounds low, but for cheesecake, it really isn't.
This is a large roasting pan. You can use any large pan, even a 13x9. I wanted it to be as large as possible, but that's not really important. The big deal is the steam/condensation.

Fill the pan halfway with water.

Now carefully stick the two pans in the oven:
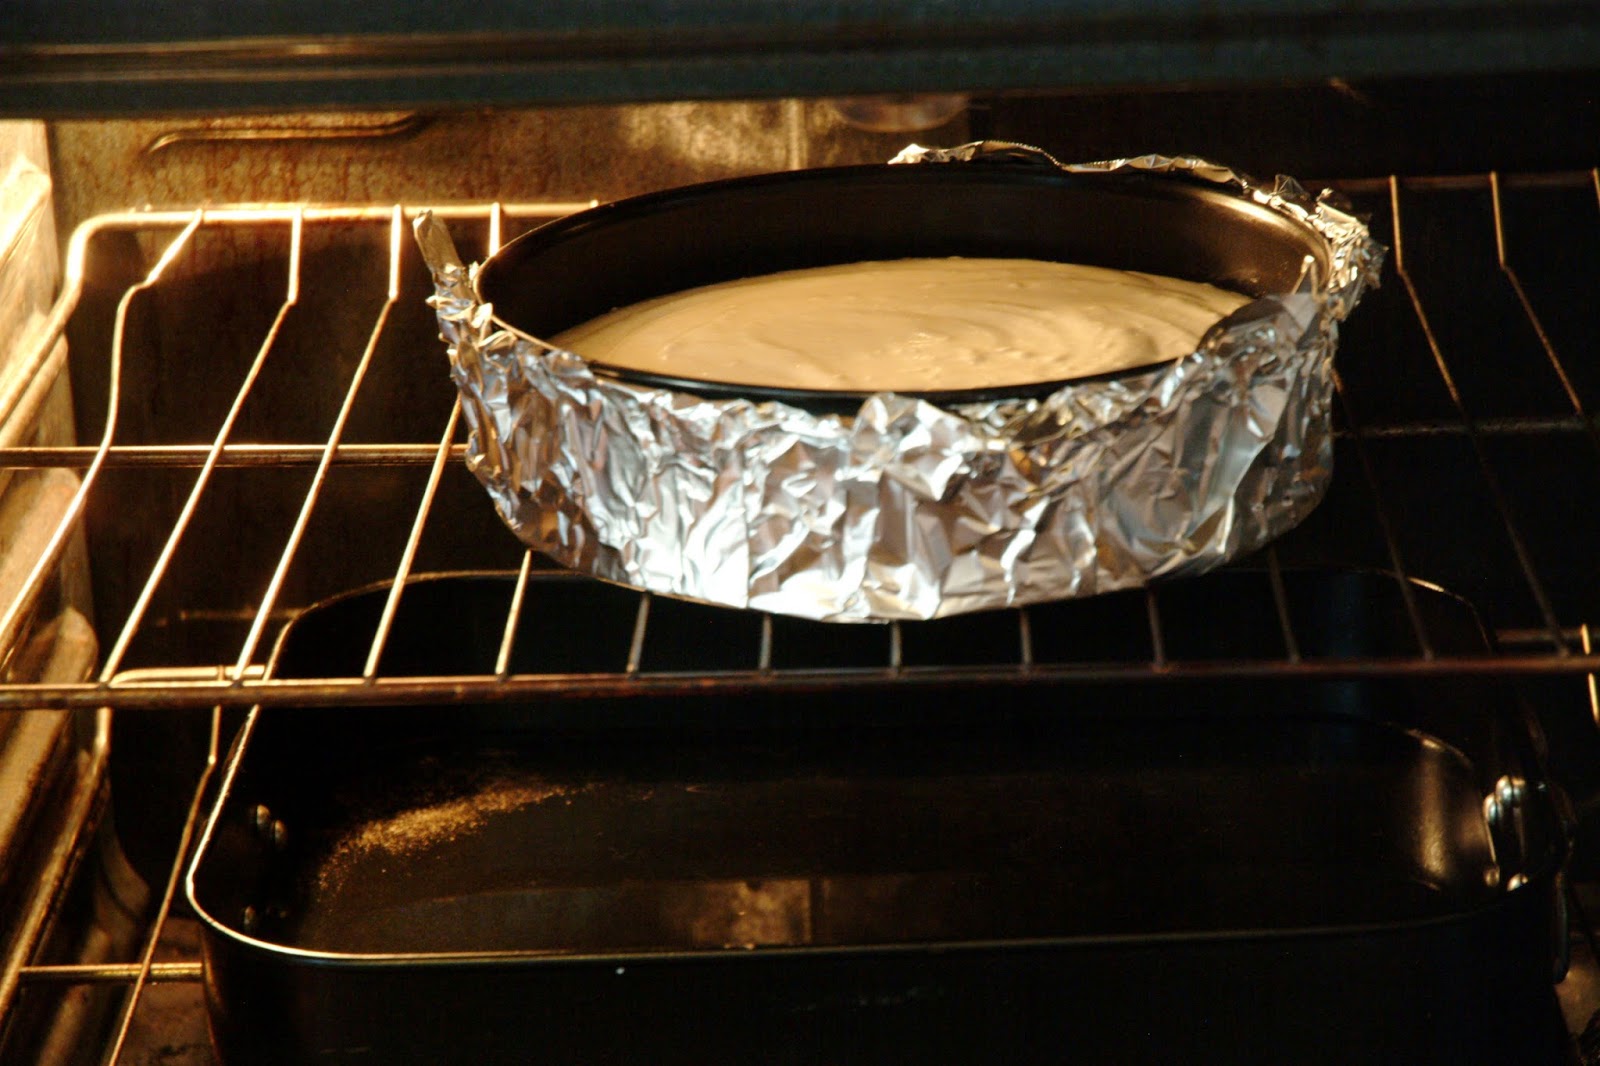
Just like that.
Now you are going to leave the cheesecake for two solid hours. Don't open the oven! Not even for a peek.
Once the two hours are up, don't take out the cheesecake. Again, don't even open the oven! Instead, just turn the oven off and let the the cheesecake sit for about 5 hours. Yes, 5 hours! It does matter.
And while the cheesecake is (metaphorically speaking) still in the oven, I'm going to take a minute to explain to you some of the things I left hanging earlier.
1. Not overmixing the cheesecake. If you do this, it causes too much air to enter the batter, and this in turn causes cracking.
2. Wrapping the pan in foil. Springform pans leak. Wrapping the pan prevents little pieces of cheesecake falling out and steam getting in the cracks, which causes a waterlogged cheesecake.
3. Preheating the oven to 250. A high temperature causes the cheesecake to burn easily. You don't want a brown crust on the top of a cheesecake. And it encourages cracking, too.
4. Letting the cheesecake cool in the oven for 5 hours. Removing it too soon and trying to cool it will do bad things to the texture of your cheesecake.
Ah, now. Don't you feel better? And now for that cheesecake!
After 7 hours, it was no longer light. So I had to take this picture in the dark, and as I'm not good with my flash, here's what happened:

At least you get the idea. Cover the cheesecake in plastic wrap and refrigerate it overnight before serving.
Here it is the next day!

Open the springform pan.


The advantage to using parchment paper on the bottom of the pan is that you can slide it easily onto other surfaces, like this.

Plus the crust doesn't fall apart when you try to slice it.
Now you can do things like this, if you want.

All I did was decorate the cheesecake with fresh fruit and chocolate shavings. (Just stick some chocolate in the freezer for 15 minutes and then use a vegetable peeler or small knife to produce the shavings).
Nice and simple.

But it sure did make a pretty cheesecake!
This was the test.
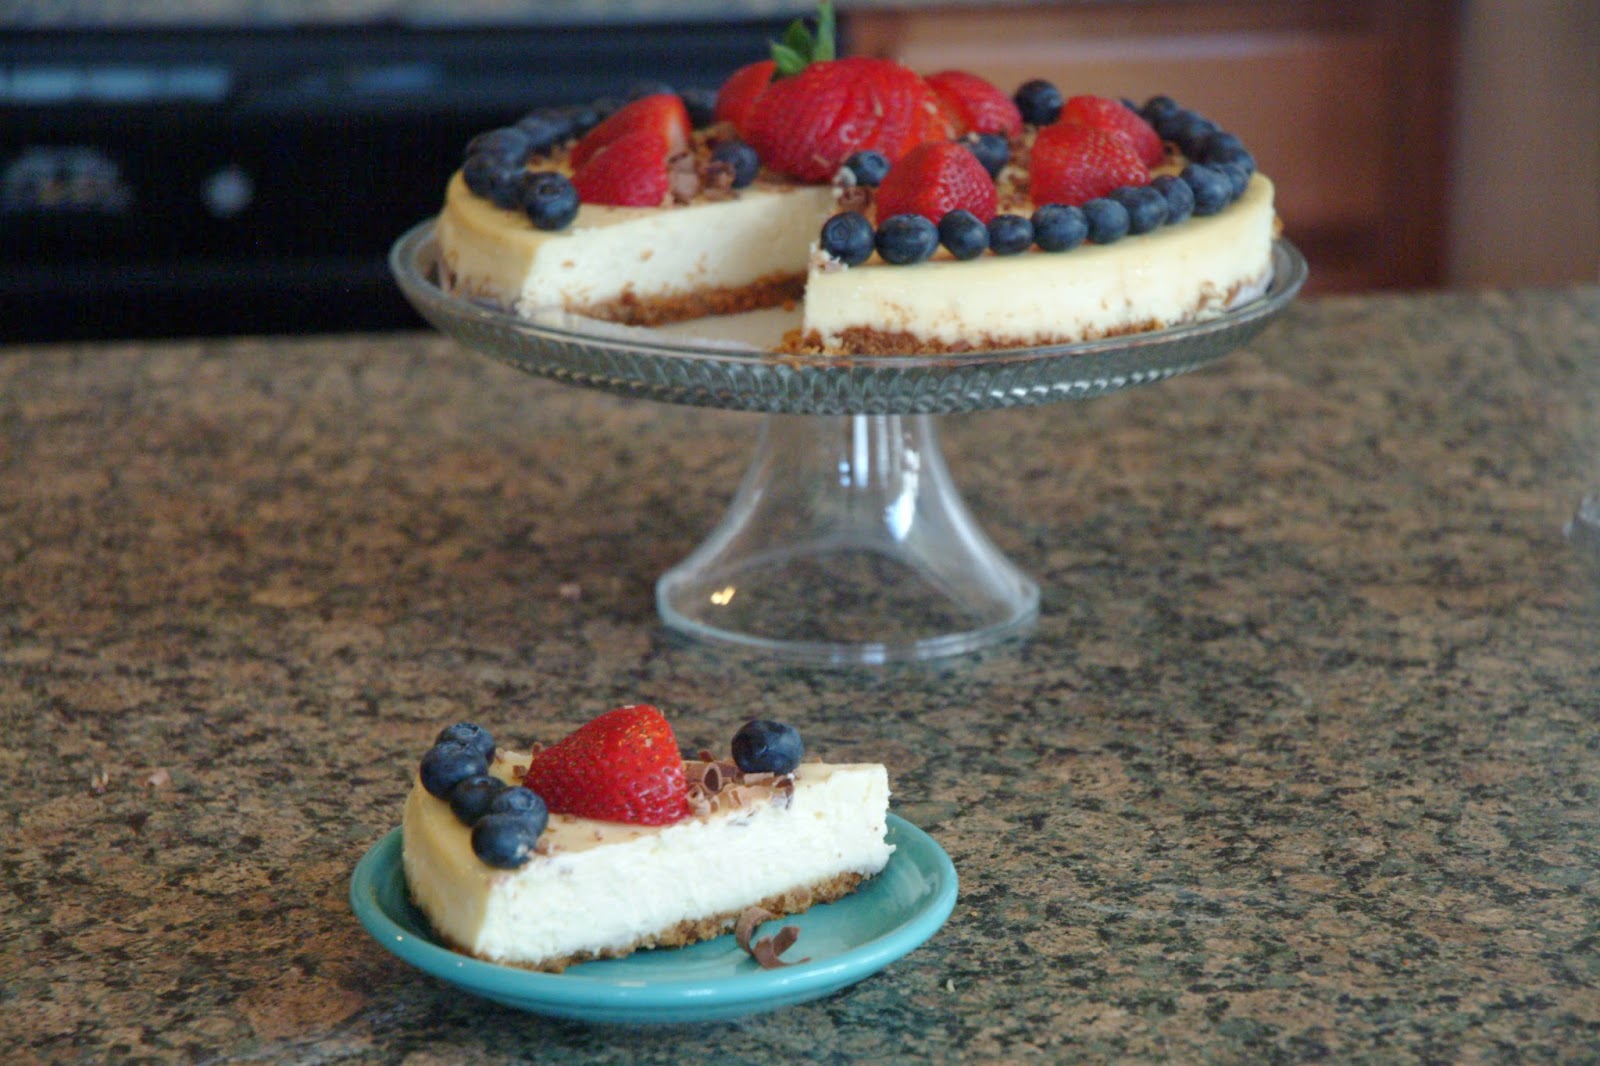
The test was passed! This cheesecake was just perfect. It turned out dense and rich, and not too moist, and without cracks!! A triumph.

Whipped cream on cheesecake is a must.

Make it soon! Especially if you're a cheesecake fan.
Variations:
You can put whatever you like on top of a cheesecake. Any kind of canned pie filling (blueberry, cherry) would be wonderful. Strawberry topping is a classic. Oh, and try white chocolate! It'll probably change your life.
Love, Tasha
What a good looking blog and cake!
ReplyDeleteWow, thank you!! And we're just getting started!
DeleteThat just looks ridiculously good. I love, absolutely love, cheesecake!
ReplyDeleteThanks! Me too.
DeleteIt was as good as it looks, let me tell you. Thank you, Sydney and Tasha.
ReplyDeleteThank you Mom!! <3
DeleteSydney, I love this. Not sure when you started but you can count on me to follow your post. I just love this...
ReplyDeleteDwayne
Hey, Mr. Dwayne! Wow thank you, I'm honored!
DeleteHi Sydney. This is a great blog posting. Maybe with you and Tasha, I might just be willing to try more adventurous cooking than a spinach, mushroom and cheese omelet
DeleteHaha! Thanks, Auntie Deborah. :)
Delete